![DistributedCOM DC Server Event ID 10016 DCDIAG Error [Fixed]](https://whomadethisproduct.com/wp-content/uploads/2025/12/DistributedCOM-DC-Server-Event-ID-10016-DCDIAG-Error-Fixed.jpg)
DistributedCOM DC Server Event ID 10016 DCDIAG Error [Fixed] Leave a comment
Read this information to learn to repair the dcdiag error message, “The machine-default permission settings do not grant Local Activation permission for the COM Server application with CLSID” Event ID 10016 error.
Step 0: Review the Problem Background and Overview
I lately promoted a Windows Server 2019 Server as an extra DC in a site. After selling the server, I accomplished the next duties:
- Confirmed that the server was added to its AD web site
- Ran “repadmin /kcc” and verified {that a} replication connection was mechanically generated.
- Verified that the server’s subnet is related to its native AD web site.
Finally, to make sure that there have been no replication errors, I ran dcdiag (hyperlink opens in a brand new browser tab) and piped the outcome to a textual content file. When I reviewed the file, I discovered that the server failed the SystemLog check.
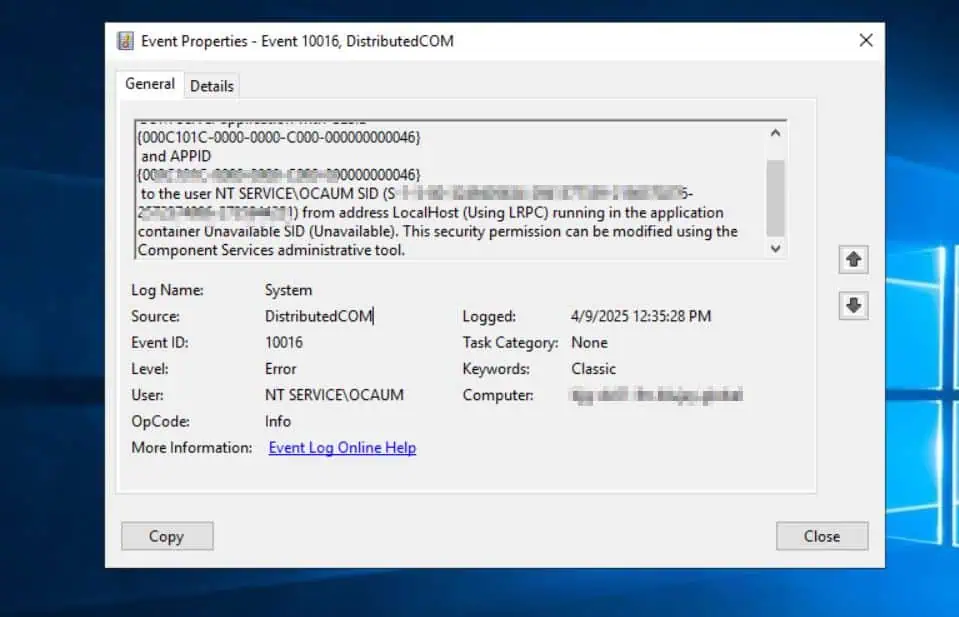
Further evaluate of the dcsdiag file signifies that an occasion log was logged with the next particulars: “The machine-default permission settings do not grant Local Activation permission for the COM Server application with CLSID.”
The supply of this occasion within the System occasion log is DistributedCOM, with an Event ID of 10016. The error particulars are within the screenshot under.
I’ve defined the steps I took to repair the error message within the remaining sections of this text.
The first two steps under contain enhancing the Windows registry. As this will likely break your server, it’s strongly really useful to take a snapshot of your server if it’s a VM or again the server up if it’s a bodily server.
Step 1: Change the Ownership of the CLSID Registry Keys
- Get the offending software’s CLSID from the occasion error log. This is the sting of values subsequent to the CLSID within the occasion error log. I’ve highlighted the applying’s CLSID ID within the screenshot under:

- Search for and open Regedit. Then, navigate to HKEY_Classes_RootCLSID<the CLSID string from 1 above>.
Since there are such a lot of registry keys within the “HKEY_Classes_RootCLSID” registry path, one of the simplest ways to find the important thing you want is to repeat the important thing from the occasion log, paste it after “” on the and press the enter key.

- Right-click the registry key and select permissions.

- After that, click on the Advanced button within the registry key’s permission properties web page, then click on the Change button subsequent to the Owner.

- Then, enter Administrators within the Enter the thing names to pick out field and click on Check Names > OK.

- Finally, verify the Replace house owners on sub containers and objects checkbox and click on OK.

- Finally, grant the Administrators group Full Control and click on OK to shut the registry key’s permissions properties window. Do not shut the registry editor but, as you’ll need to in Step 3 under.

Step 3: Change the Ownership of the APPID Registry Keys
- Get the offending software’s APPID from the occasion error log. See mine within the screenshot under.

- Back within the registry editor, navigate to KEY_LocalMachineSoftwareClassesAppID registry key, enter the identify of the APPID out of your occasion log on the finish of the above path, and press enter.

- Right-click the APPID’s registry key and select Permissions. Then, repeat steps 4, 5, 6, and seven of the final part to make the Domain Administrators group the registry key proprietor—keep in mind to grant the Administrators group Full Control.

- Close the registry editor.
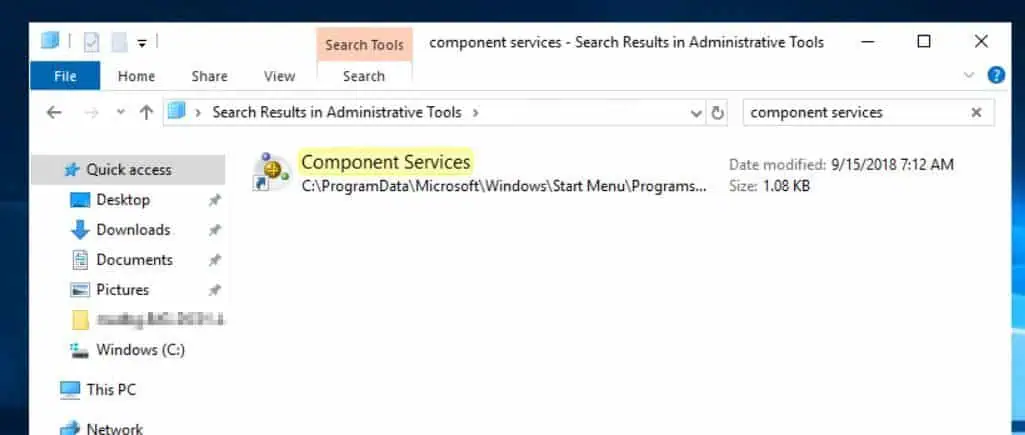
- Search for and open administrative Tools. Then, find and open the element providers – you may seek for it.
- Then, develop Component providers > Computer > My Computer and click on DCOM Config.

- After that, develop DCOM Config, search for the corresponding service within the error viewer, right-click on it, after which select Properties.
If you obtain the warning message within the screenshot under, choose Yes. The app IDs that start with “{” might be towards the top, so you will need to scroll down the DCOM Config checklist to see the one you’re in search of.


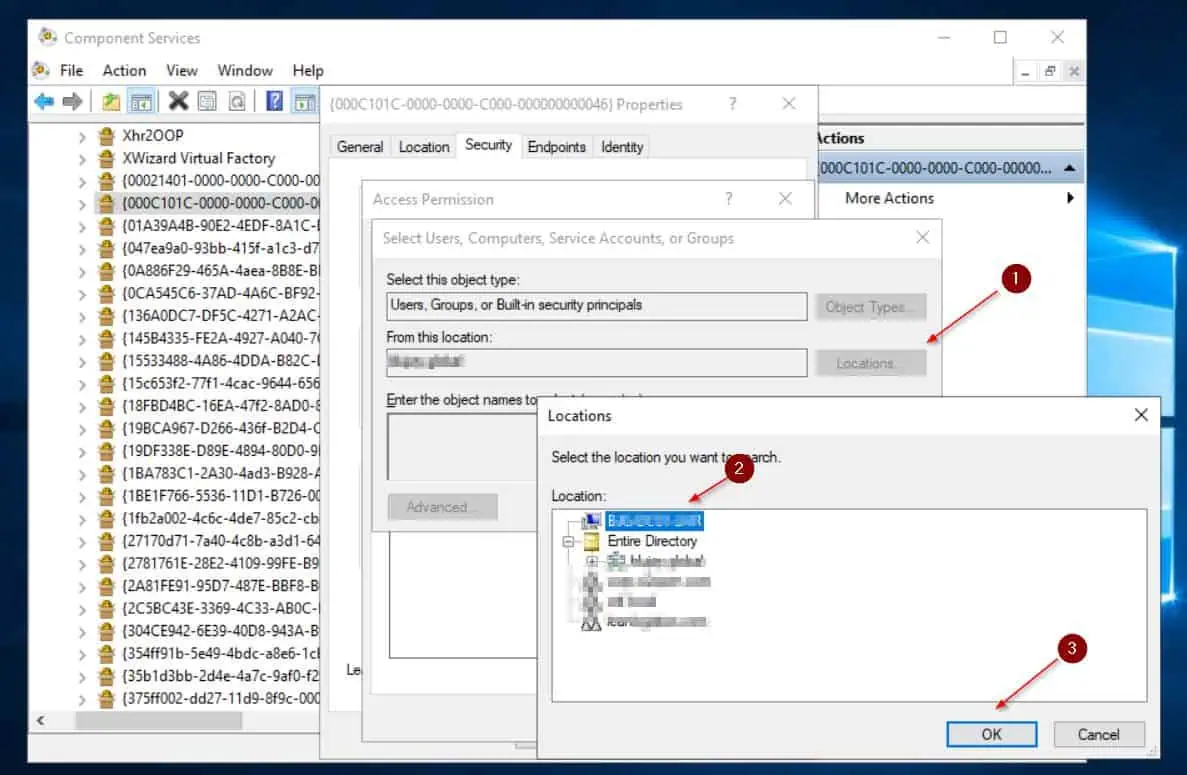
- On the Properties window, choose the Security tab, then within the Access Permission part, choose Customize, then click on the Edit button.

- After that, click on the Add button.

- Then, click on the Locations button subsequent to From this location, choose the identify of the native server and click on OK.
- After that, within the Enter the thing identify to pick out subject, enter the identify of the account displayed within the occasion log error (NT SERVICEOCAUM) see the primary screenshot under) – then, click on Check Names, and OK.


- Finally, grant the account Local and Remote entry, then click on OK and OK.


Step 5: Rerun DCDIAG to Confirm that the SystemLog Test Passed
- Clear the System occasion log by right-clicking it and selecting Clear log. Save a duplicate of the log within the course of should you require it for additional troubleshooting.

- After that, rerun dcdiag to substantiate that the SystemLog check handed.

Conclusion
Fixing the “The machine-default permission settings do not grant Local Activation permission for the COM Server application with CLSID” Event ID 10016 error is so simple as granting the account within the occasion log error permission to the COM Server software.
In this “fix it” information, I walked you thru the steps to finish this activity utilizing a real-life error I encountered after selling a Windows Server 2019 server to a DC.
I hope this text met your expectations. Let me know by responding to our “Was this page helpful?” request under.