
How to Fix a Tombstoned Domain Controller Leave a comment
Read this information to learn the way to repair a tombstoned Active Directory Domain Controller, a DC that has not replicated to different DCs for a interval over the Tombstone Lifetime.
Step 0: Review Problem Background and Overview
When you run dcdiag, different DCs within the area report that the offending DC final synched on a date over the tombstone lifetime, which is 180 days by default.
Here is a pattern log entry I acquired once I ran dcdiag:
Last replication acquired from <area controller title> at 2022-09-08 06:09:58. WARNING: This latency is over the Tombstone Lifetime of 180.
I ran the dcdiag command on April 10, 2025. This means the offending area controller had not synced with different DCs for over 2 years! When this occurs, we are saying that the DC has been “tombstoned,” which implies that it has information older that the AD Forest’s Tombstone Lifetime.
As a part of the primary steps to troubleshoot and repair the issue, I carried out the next actions:
- Confirmed that every one required firewall ports between the tombstones DC and the FSMO function DC are open.
- Enabled DNS Debug logging. Then, after 24 hours, verified that the server is simply speaking with itself, and has not accepted any incoming shopper requests.
- Enabled netlogon debug logging. After 24 hours, verified that the server didn’t reply to any logon or different occasion requests.
Once these duties have been carried out, I had stable proof to verify that the DC was damaged. In this state of affairs, the one answer was to demote the DC, carry out metada clear up after which, re-promote the DC.
In the remaining sections of this information, I’ve defined the detailed steps I used to accomplish these duties.
Step 1: Remove the DNS Server Role from the DC
This have to be carried out first. Otherwise, the DC demotion process (Step 2) fails.
#Open PowerShell as administratorUninstall-WindowsFunction -Name DNS
Restart the server to full the removing of the DNS function.
Step 2: Remove the Global Catalog Role from the DC
If the server is badly damaged, it’s essential to take away the Global Catalog function from the DC. Otherwise, the DC demotion can even fail.
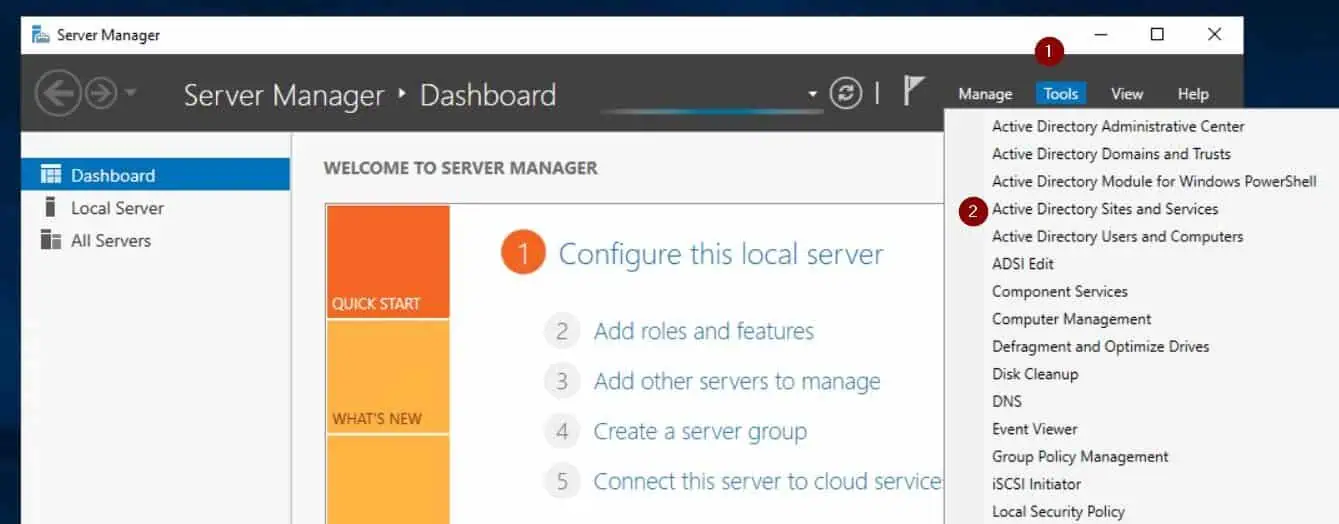
- Open Active Directory Sites and Services by way of Server Manager (hyperlink opens in a new browser tab).
- Then, navigate to the DC’s web site and develop it, then develop Servers and click on the server title. On the small print blade, right-click NTDS Settings, and choose Properties.
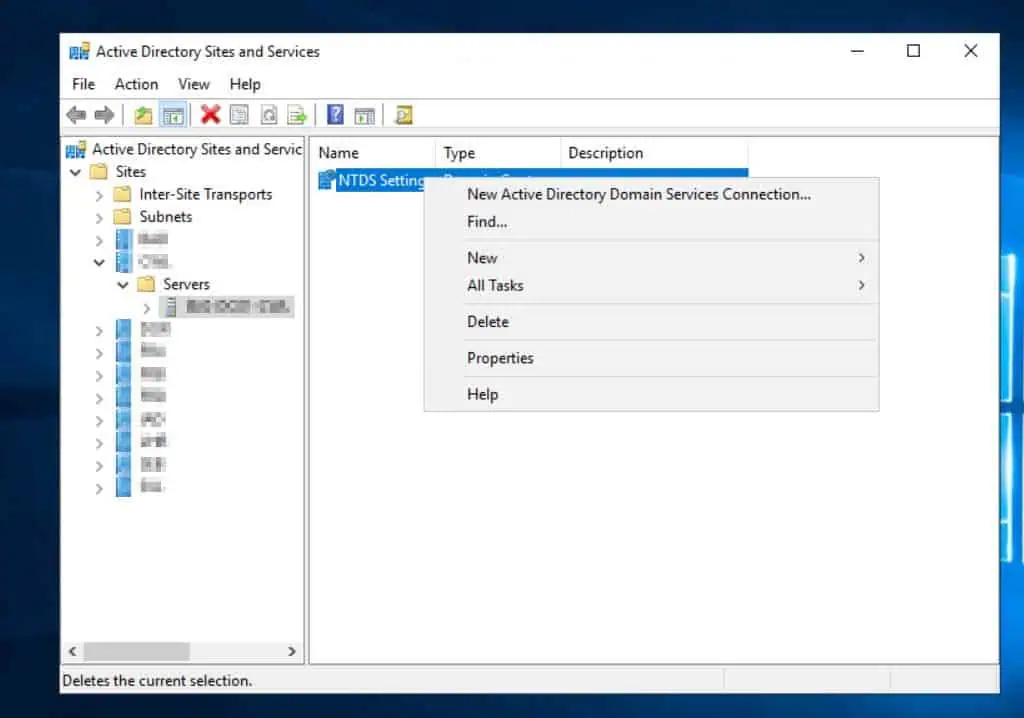
- After that, clear the Global Catalog examine field, choose Yes to the warning message, and eventually, choose OK.

Step 3: Demote the Server as a Domain Controller
#1. Save the password to use as native Administrator password. At the cred immediate, enter Administrator because the username after which, the password you need to use because the server's native Administrator password publish its demotion as a DC$password = Get-Credential
#2. Demote the Server as a DC
Uninstall-ADDSDomainController -NativeAdministratorPassword $password.password -Confirm:$false -NoRebootOnCompletion -ForceRemoval -SkipPreChecks
See the outcomes of the instructions beneath:


Restart the server to full the demotion.
Demoting the server doesn’t take away the Active Directory Domain Services (AD DS) function. So, we might not want to reinstall it.
After demoting the DC, earlier than re-proting it, it’s essential to carry out a metadata cleanup of the DC utilizing ntdsutil.
Follow the steps beneath to full this process.
- Determine the FSMO function holder by operating the command beneath from any Domain Controller.
netdom question fsmo
- Sign into the DC that holds the FSMO roles and open the command immediate as administrator. Then, run the next ntdsutil instructions within the order offered.
#1. Type ntdsutil and press enter. Then, on the ntdsutil immediate, kind metadata cleanup and press enterntdsutil: metadata cleanup
#2. On the metadata cleanup: immediate, execute the followin instructions
metadata cleanup: connections
metadata cleanup: join to server <domain_fsmo-role-holder>
metadata cleanup: q#3. Then, on the metadata cleanup: immediate, kind choose operation goal, then press enter key.
metadata cleanup: choose operation goal
#4. On the choose operation goal: immediate, run the next instructions so as:
choose operation goal: listing domains
choose operation goal: choose area <enter quantity for the area the place the failed DC resides>
choose operation goal: listing websites
choose operation goal: choose web site <enter the positioning variety of the failed DC>
choose operation goal: listing servers in web site
choose operation goal: choose server <enter variety of the server>
choose operation goal: q#5. On the metadata cleanup: immediate, execute take away chosen server
metadata cleanup: take away chosen server
Then, on the Server Remove Confirmation Dialog, verify that the DC you need to take away is displayed, then choose Yes.
#6. Quit metadata cleanup and ntdsutil by executing the q command in each prompts

- Log on to the FSMO function DC and drive replication by operating the command beneath from a command immediate opened as administrator.
repadmin /syncall <domain_fsmo-role-holder> /Aped
Quit the repadmin command by urgent any key.
- Then, monitor the progress of the replication by operating the command beneath. Replace the textual content in daring with the Distinguished Name of the server you’re cleansing its metadata.
repadmin /showobjmeta * "<enter the Distinguished Name of the server here>"
Do not proceed with the subsequent steps till each DC studies that it will possibly’t discover the area controller you’ve simply faraway from the area. If all DCs report “Directory object not found,” then you’ll be able to proceed to Step 5 beneath.

For the avoidance of doubt, the above command should solely return components of the consequence that claims “Directory object not found.” If it rertuns a desk, it’s essential to wait till the command not returns a desk.
Step 5: Reinstall the DNS Server Role on the Server
In Step 1, we eliminated the DNS Server function. Before selling it to a DC, it’s essential to reinstall this function with the next steps:
- Sign in to the server as native administrator – enter .administrator within the username discipline – and use the password you laid out in Step 3 whenever you demoted the server as a DC.
- Execute the command beneath to reinstall the DNS Server function, together with all sub-features and administration instruments, and restart the server if required.
#Open PowerShell as administratorInstall-WindowsFunction -Name DNS -IncludeAllSubFeature -IncludeManagementTools -Restart
#see the screenshots beneath for the progress and results of the command


Step 6: Repromote the Server to a Domain Controller
While nonetheless signed in to the server with the native administrator account and PowerShell opened as administrator, execute these instructions to promote the server to a DC.
I ran this command a number of occasions and it stored failing with error, “An Active Directory domain controller for the domain “FQDN” couldn’t be contacted.” There was a drawback with the DNS title decision.
#1. Generate the required parameters. When you run this command, PowerShell will immediate you to enter creds - enter the area username (domainnameusername) and the password with permissions to promote a server to a Dc.
#The command additionally prompts you to "Enter the domain to promote into" - enter the FQDN of the area$HashArguments = @{
Credential = (Get-Credential)
DomainName = (Read-Host "Enter the domain to promote into")
InstallDns = $true
}#2. Promote the server to a DC and configure the server as a DNS server. This command will immediate you to enter the ProtectedModeAdministratorPassword (the Directory Service Restore Mode, DSRM password)
Install-ADDSDomainController @HashArguments
The screenshots beneath present the inputs and outcomes of the instructions.


Step 7: Configure the DC in Sites and Services
- Log in to the server along with your area credentials and open Active Directory Sites and Services from the Server Manager Tools menu.
- In the Active Directory Sites and Services console, navigate to the server’s web site and develop it. Then, develop Server > <the DC’s server title> and left-click NTDS Settings.
- In the small print blade, verify that the replication connection was mechanically generated. If it has not been generated, run the command beneath to generate it.
repadmin /kcc

- After that, confirm that the server’s subnet is related to the positioning. To do that, right-click the positioning and select Properties. The server’s subnet needs to be displayed within the Subnets part of the General tab – see the second screenshot beneath for reference.
I included the ipconfig command consequence within the second screenshot to evaluate the server’s subnet with the subnet displayed in its web site’s Subnet in AD SS console.


Step 8: Perform Manual Replication and Verify Success
- While nonetheless signed in to the server, open PowerShell or CMD as administrator and run the next command:
repadmin /syncall <enter the title of the FSMO DC right here> /Aped
Wait for the replication command to full, then press Q earlier than continuing to the subsequent step.
In my case, my command returned an error, as one of many DCs couldn’t be contacted. However, this didn’t cease me from continuing to the subsequent step.

- Verify that the repadmin command was profitable by executing the PowerShell command beneath:
Get-ADReplicationPartnerMetadata -Target $env:userdnsdomain -Scope Domain | Select-Object Server, LastReplicationAttempt, LastReplicationSuccess, AccompliceType
Depending on the variety of DCs and websites in your surroundings, the command will take a whereas to full.
In my case, the above command failed to contact some DCs. Further troubleshooting confirms that the AD ports required to replicate and work have been blocked from the DC the place I ran the Get-ADReplicationPartnerMetadata command.
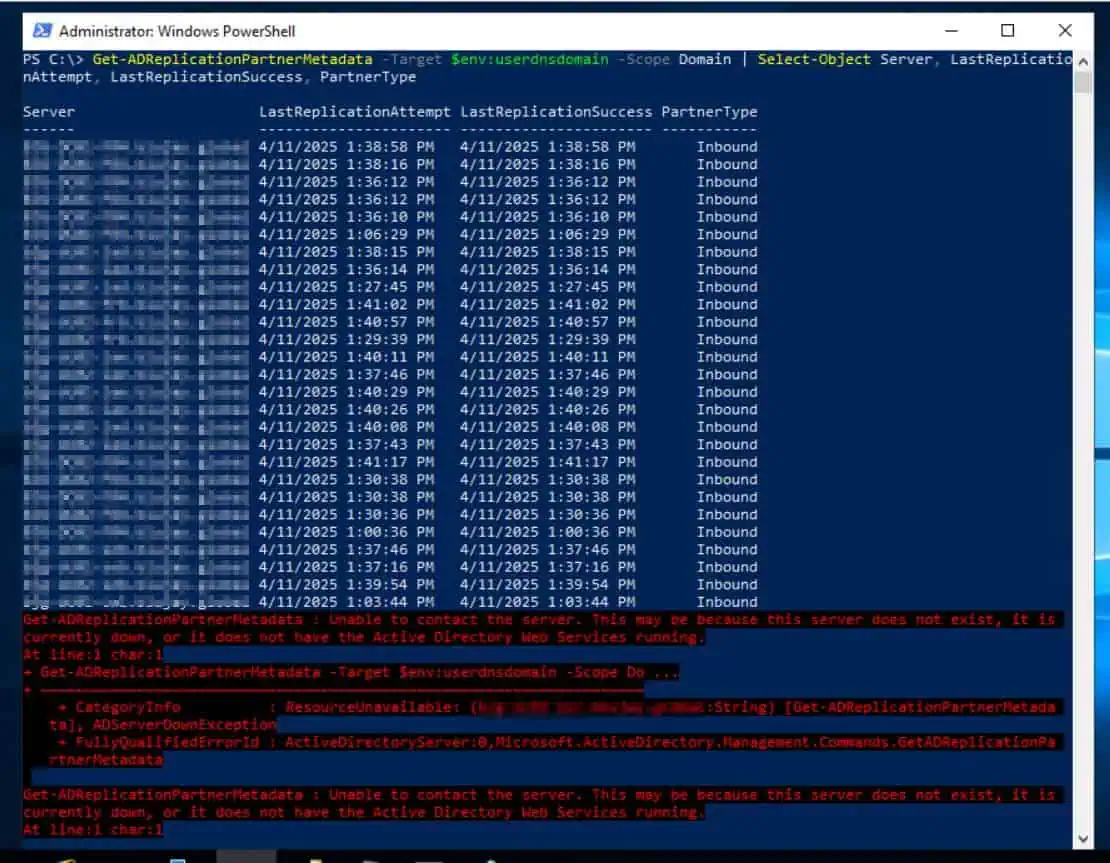
To repair the issue, I requested that the SecOps group open these ports. Once the ports have been opened, I re-ran Get-ADReplicationPartnerMetadata, and there have been no extra failures.
Step 9: Rerun DCDIAG to Check for Replication Errors
Finally, rerun dcdiag within the DC you simply repaired and on the FSMO function DC to examine for replication errors.
Conclusion
The Windows Active Directory Domain Controllers are designed to often replicate and replace the AD database. However, in uncommon situations, one DC could cease replicating.
If this occurs and you’ve got confirmed that every one required AD ports are opened, the final step to repair the DC is to demote it, carry out metadata clean-up of its objects from the AD database, and eventually re-promote it to a DC.
In this information, I outlined the detailed steps to repair a tombstoned AD DC by following the above steps.